
High-level overview of The Spots scheduling system and process
Below you will find an overview of the different sections put in place to help schedule and manage your clients! Please do not hesitate to reach out with any questions as this can be a lot of information to process!
Recommended - Email Auto Reply
This is an auto email that gets sent out to anyone that emails you. This is a sample template
Hello,
If you are inquiring about booking an appointment, please read below for all of the information you will need.
IF YOU WOULD LIKE TO BOOK AN APPOINTMENT PLEASE FILL OUT THE FORM BELOW:
Please note that appointments will only be scheduled once the Tattoo Request Form has been received.
I require a $100 deposit to book an appointment. This deposit is *NON-REFUNDABLE* and will be taken off the final cost of your session. Please note if you require more than one session, your deposit will be taken off your final session only. Deposits are to be paid via e-transfer within *24 hours* of confirming your appointment date and time. Canceling with *less than 3 days* notice of your appointment OR rescheduling your appointment more than twice will forfeit your deposit.
Please be as detailed as possible when submitting your request. I do most of my consultations via email, but we can schedule one if you require an in-person consultation. If there are any questions about your idea, please feel free to email your inquiry over. Please note I DO NOT SHARE DESIGNS ahead of time, you will see your drawing when you arrive for your appointment, and I am happy to make tweaks if necessary.
I work out of [Sample Shop] located at [Address here].
Thank you so much for your interest in my work!!
Kind regards,
The Spot
@the.spot.ink
Organizing your email
I would also organize your email with labels/folders similar to the structure below. Create a folder for you and then all the other status folder to help organize. When I usually take over someone’s email I go back and make sure I’ve replied to the last month of requests and then I move EVERYTHING into a ‘Z – Original Emails’ folder. I keep only the folder structure you see to keep things simple. You want your inbox to have basically zero emails in it every day or so. This will help you stay on top of the process!

Tattoo Request Form
This is the form that people will fill out to submit a tattoo request. I recommend putting a copy of this link in your Instagram with a direct link. If you have more than one link you’d like to post I recommend setting up LinkTree!
A copy of this request is sent to the client for their records.
The request is then loaded into your application under the New Request Section.
Review form here:
Copy of request sent to the client after they submit their request:
Hi <<Client Name>>,
Thank you for your interest in being tattooed!! A copy of your submission is attached. Please do NOT reply to this email. Forward any additional information to info@thespot.ink.
Kind regards,
The Spot
<<PDF COPY OF SUBMISSION Attached>>
The New Request is then loaded into the application under the New Requests tab:
Application Overview
Your application is hosted in a program called AppSheet. Please download this app from the App Store and login with your email account.
You can also view your application in a browser. You will use your email to log in.
Links will be sent to you.
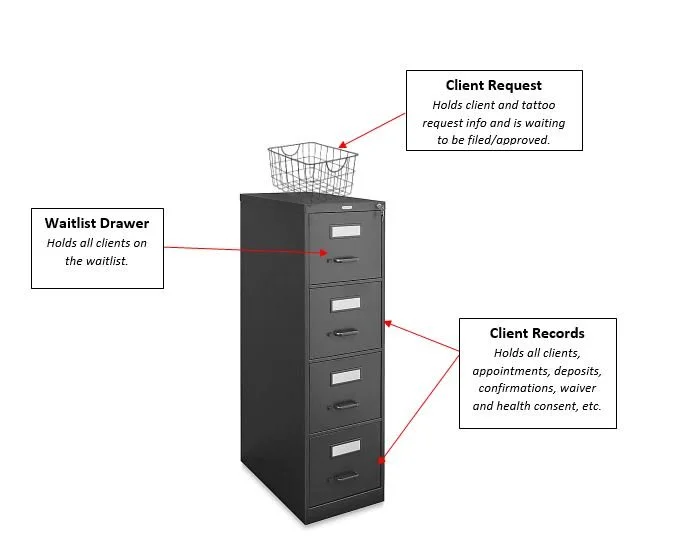
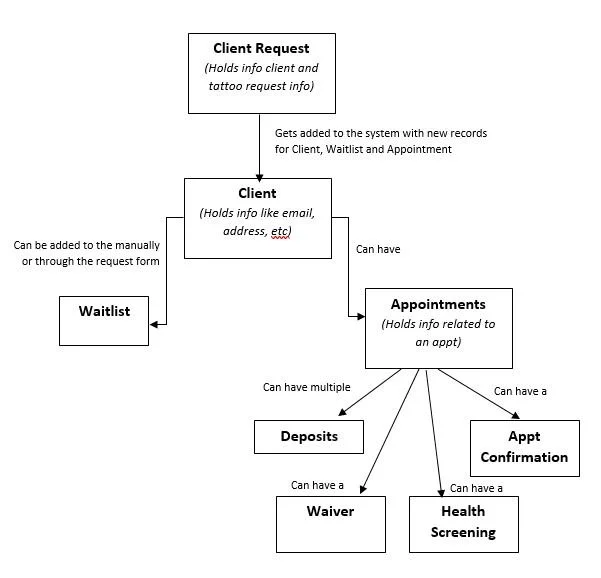
To give you an overview of the application you can visualize it as a filing cabinet. At the top of the filing cabinet, there are a bunch of folders that contain requests. An artist reviews each of the folder requests and then once reviewed they get filed. Each client's waitlist info gets added to the top Waitlist drawer and then they get their own drawer in the filing cabinet and inside that drawer, they have a folder for Appointments that hold information about the deposits, confirmations, and covid responses for that specific appointment.
Application Sections
The main tabs of your app are:
New Requests - This is where new requests come in from your Tattoo Request form. This is where The Artist reviews the submission and sets an approval status (Approved, Rejected, More Info Needed), Time Needed and other information related to the approval.
Clients to Book - This lists all the appointments that have been reviewed by The Artist and have been saved with an approval status. This list keeps track of all requests needing to be booked and where the scheduler with typically work from.
Dashboard - The is where multiple views are displayed. Best viewed on an iPad or computer. You will see all you upcoming appts listed in the top left, calendar in the bottom left and the details of whatever appt is selected from either the list or the calendar. Note that you can move the windows around by clicking on the title and drag and dropping. You can also resize the windows by clicking and holding the bottom right of each window and moving it.
Calendar - This is where all appointments that are in the following status are displayed: Awaiting Confirmation, Waiting for Deposit, Confirmed, Personal.
Booked - This is where all Confirmed appointments are displayed in a list. All icons related to confirmations, set rate, and covid rules are displayed.
In the upper left menu you will find these other features (if applicable):
Admin - This is a view that is used similar to Clients to Book but is to be used on a device larger than a phone like an iPad or desktop computer. It helps to schedule appointments by displaying different views at one time.
Clients - This displays a list of all the clients within the system.
New Personal Appt - This is where you would create a new personal appointment.
New Appt - This is a shortcut to creating a new appointment.
Waitlist - This is where you can see all of the people on your waitlist.
Assistant - a way to search your whole app for content (not commonly used).
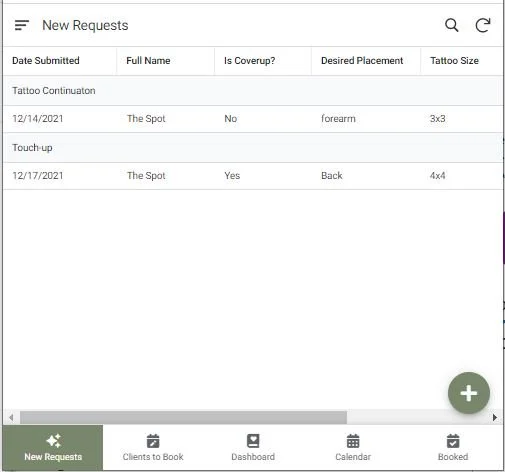
New Requests Section
When a client fills out the New Request form the submission will be saved to the New Request tab. All requests are sorted by Project Type selected in the request.
Click on a row to view the request.

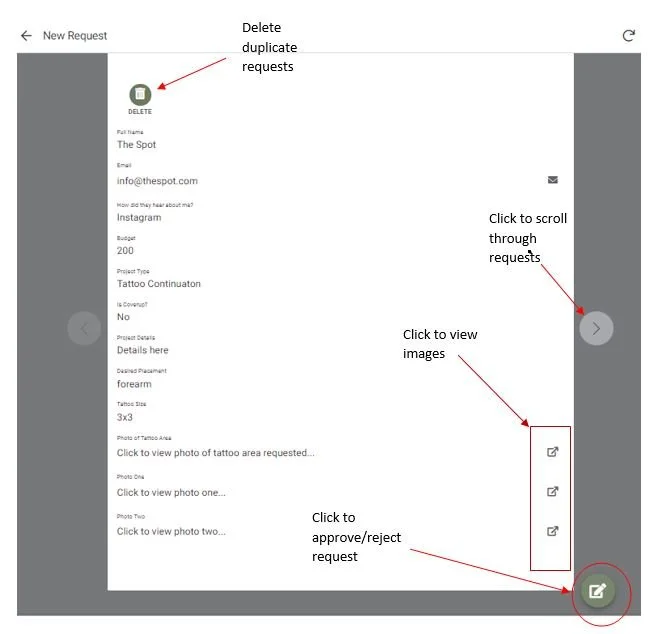
New Request Detail
When you click on a request you will see the details. There are different actions you can perform on this form.
To Approve/Reject a request click on the pencil icon in the lower right of the screen.
To view images attached with the request you can click the little arrow at the end of the image rows. This will pop up a view of the image. When done looking at the image click Done (if on iPad or phone) and you will be back at the details screen.
Click on the side circle arrows to scroll between pending requests.
If someone had submitted a duplicate request you can click the Delete icon located at the top of the form. Do NOT use this to reject or decline a request. That is done through the approval status.
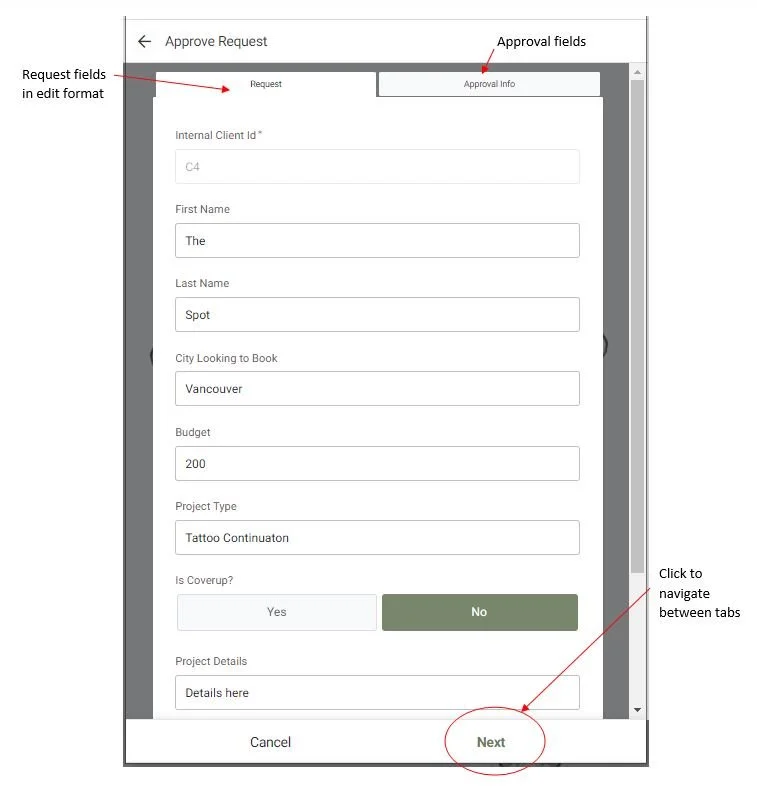
Approve New Request
This is the view where you will set the approval status for a new request.
The first tab of this screen reiterates request details in edit form. You shouldn’t have to make any changes to the form information but it can serve as a reference as you’re filling out the Approval Info.
You can navigate to the Approval Info tab by clicking the tab itself or clicking on the Next button at the bottom of the form.
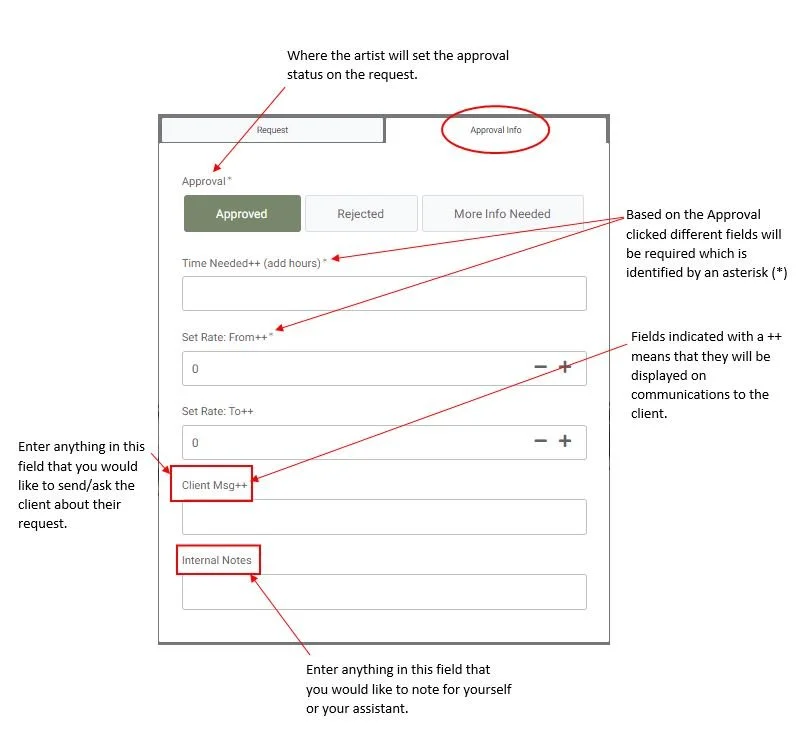
Approve New Request - Approval Info
Note that your Approval Info may be different than this based on your requirements but this should give you a generalized idea of what is needed to set the approval for a request.
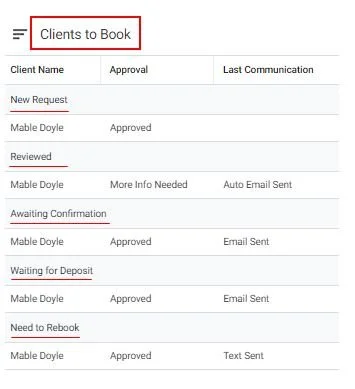
Clients to Book Section
The section is mainly used by the person scheduling the appointments.
Booking appointments go through a set of different statuses.
The main appt status flow items are:
New Requests - This is the default status when an Artist has approved/reviewed a request.
Reviewed - This is usually the status when the request has been reviewed and a follow-up question has been sent to the client.
Awaiting Confirmation - This means we have reached out to the client with an appointment date and we’re waiting for confirmation.
Waiting for Deposit - The client has approved the date and we’re now waiting for the deposit to confirm the appt.
Confirmed - The client has approved the date and has sent in the deposit (once confirmed requests are removed from the Clients to Book section).
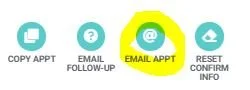
Booking Feature - Email Appointment through the application
The person scheduling an appointment will use this feature to automatically send an appointment email to the client regarding their request without having to leave the application and go through email.
There are required fields for each request that must be filled out in order for the Email Appt button to be visible:
Start Date
Start Time
Time Needed
Appt Booking Msg - (This is optional but if it is filled in the message will be added to the email)
Set Rate or other fields shown on this form (if applicable).
You will receive a copy of this email and typically they are moved into the Reviewed folder.
Below is the appointment email message template sent from the app when the Email Appt button is clicked:
Hi <<ClientName>>,
I'd like to book your appointment for your request! Please let me know if the following date/time works for you:
<<StartDate>> at <<StartTime>>
<<Appt Booking Msg>>
Mable's rates are $180/hour and you are ESTIMATED for <<Hours Needed>> (depending on size and other decisions made during appt).
Deposit Info:
If that works you can send the $100 deposit via e-transfer to the following email address: info@thespot.ink.
Note that appointments are not confirmed until we receive your deposit AND you receive an email confirmation from us.
ALL Deposits are NON-REFUNDABLE and NON-TRANSFERRABLE. Your deposit goes towards the drawing of the tattoo, securing the time slot and will be deducted from the balance of the tattoo at your appointment.
Once confirmed shop/appt info will be sent a few days before your appt.
(Note appts times will be held for 72 hours without a deposit)
The Spot
@the.spot.ink
Dashboard Section
The Dashboard Section is a custom section for the Artist to view on an iPad or computer. This is a bigger view that allows multiple sections to be displayed at once. Note that only appointments with the following statuses are displayed in this view: Personal, Awaiting Confirmation, Waiting for Deposit
Dashboard List
Shows all upcoming appointments. By clicking on a row in this view it will display in the Dashboard - Details.
Calendar
Displays all appointments. If you want to view the details of a previous appointment you can scroll through the Calendar and select the appointment to view.
Dashboard - Details
Displays the appointment details for whichever appointment was selected in the Dashboard List or Calendar.

Calendar Section
Appointments with the following statuses can be viewed on the Calendar section:
- Personal
- Awaiting Confirmation
- Waiting for Deposit
- Confirmed
These different statuses are color-coded as follows:
Awaiting Confirmation is green
Waiting for Deposit is pink
Confirmed is blue
Personal is black
(These are default colors for apps created. Your app colors may be different)
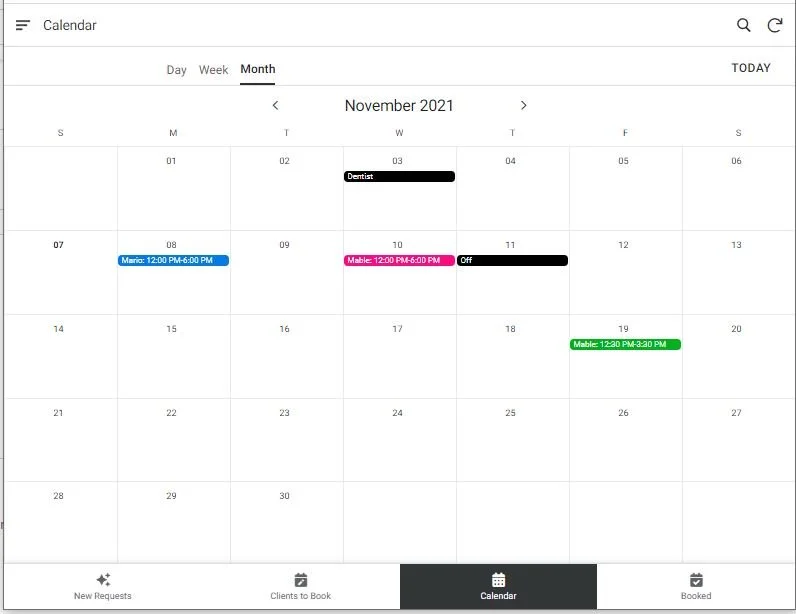
You can see 4 appointments with 4 different statuses shown here.
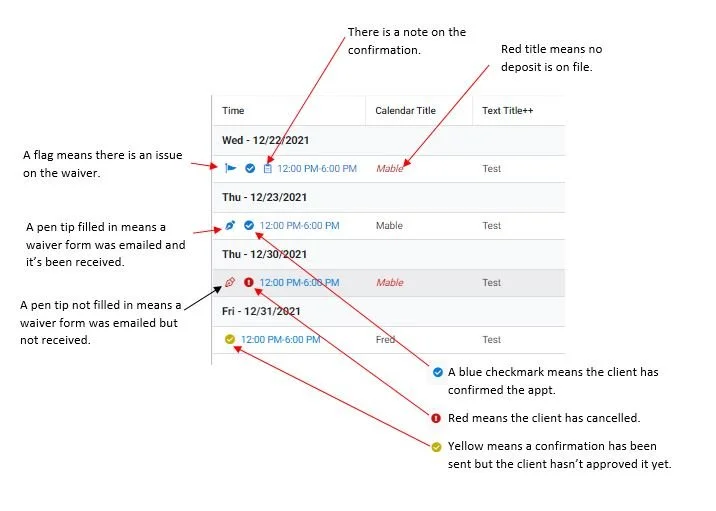
Booked Section
The Booked section shown here will only show Confirmed appointments. This view also displays various icons related to the appointment.
Icons will be displayed for Confirmations, Confirmation Notes and Waivers. The colors will only change based on the status of the confirmations. So all icons will be red if an appointment has been cancelled.
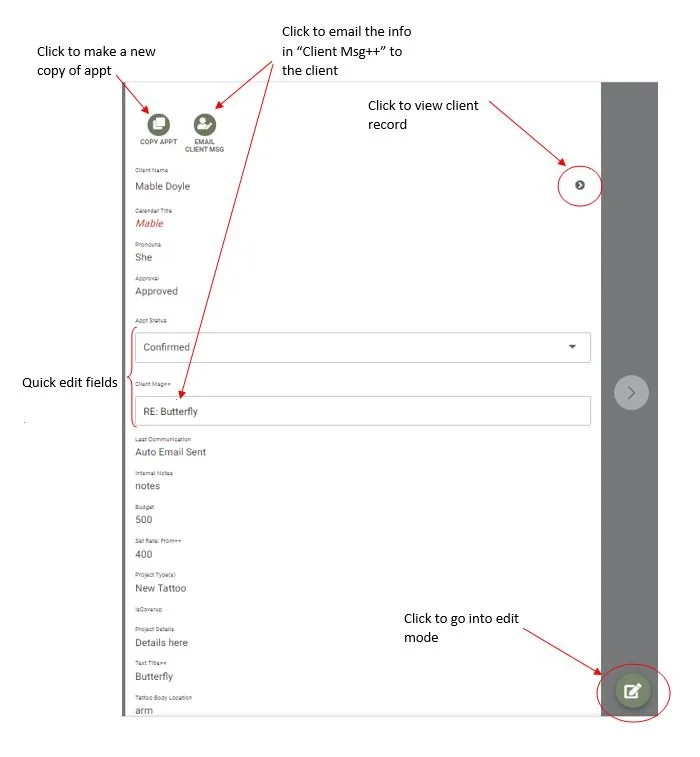
Appointment Overview
Depending on where you view an appointment different buttons and sections will be displayed.
The default view when first viewing an appointment when selected from a section such as the Calendar or Booked section is what’s called the Details view.
This is typically a read-only view with the exception of any “quick edit” fields that may have been set on the view.
You MUST have a value in the “Client Msg++” field in order for the Email Client Msg button to be visible.
View Actions:
Copy Appt - This is used if someone needs multiple sessions for a request and it’s a quick way to make copies of the appt to move to multiple dates. Once clicked you can see the new copied appointment under the client record.
Email Client Msg - This is used to send whatever is in the Client Msg++ field to the client. Often this is used when booking to send follow-up info only. When clicked a copy of the email will be sent to you and then typically moved into the Reviewed folder.
Below is the appointment client message template sent from the app when the Email Client Msg button is clicked:
Hi <<Client Name>>,
<<Appt Client Msg>>
The Spot
@the.spot.ink
Appointment Overview - con’t
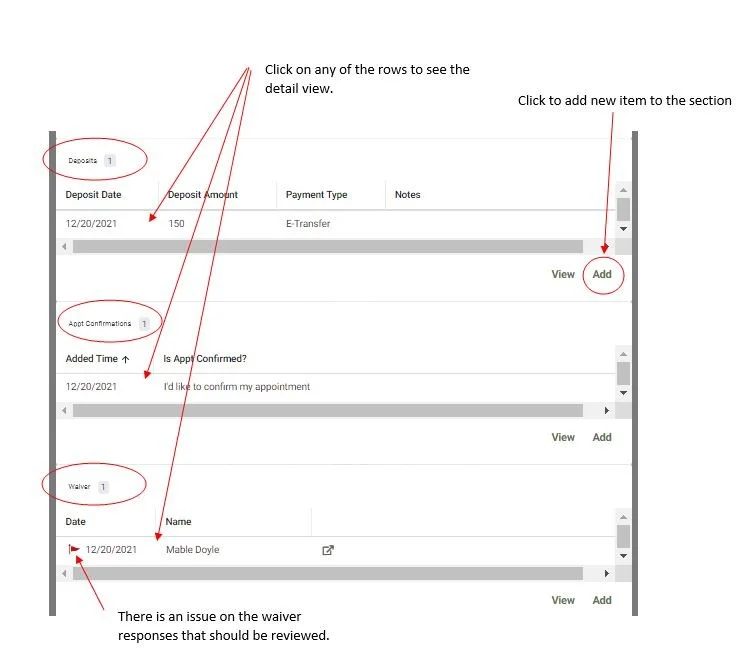
As you scroll down through the appointment you will see the Deposit, Confirmation and Waiver sections (if applicable).
Client Confirmation Email
Seven days before an upcoming Confirmed appointment a confirmation email is sent to the client asking them to confirm their appointment.
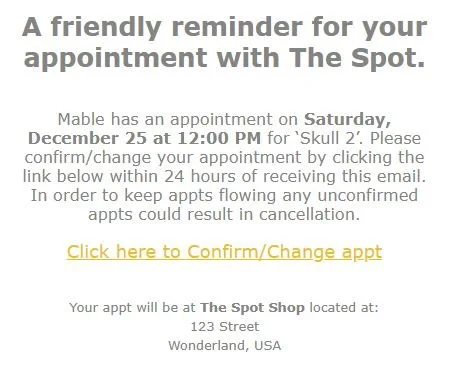
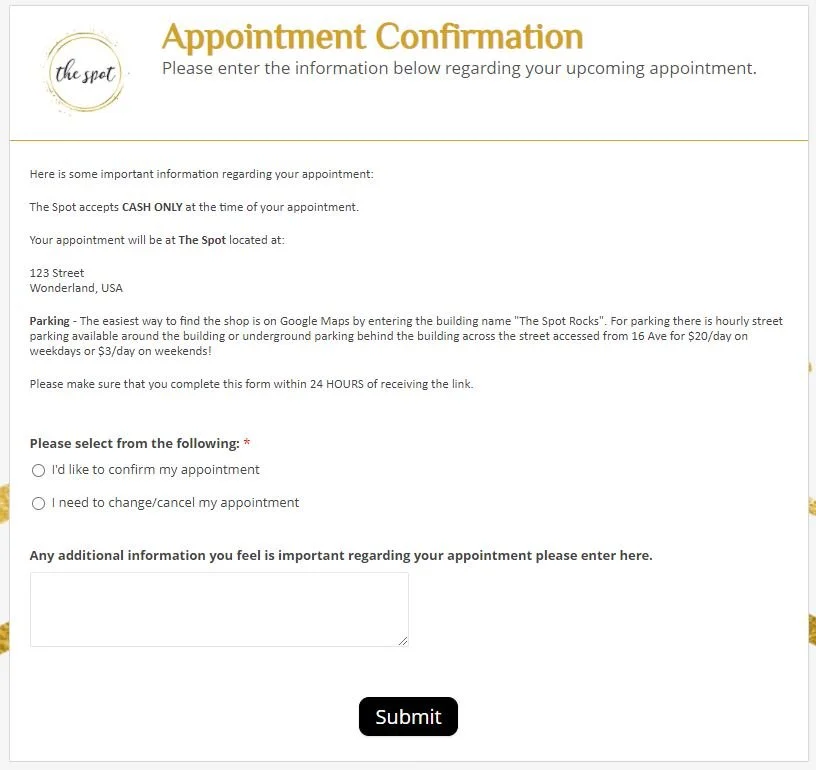
This is a sample confirmation form that the client would need to fill out to confirm/change their appt:
Confirmed Text and Final Alerts
If the appointment still isn’t confirmed within 5 days of the appointment an auto text message will be sent out to the client reminding them to confirm their appt.
If the client hasn’t confirmed their appointment after 24 hours a FINAL follow-up email and text message will be sent to them.
If the appointment still isn’t confirmed by the next day a text message will be sent to the assistant alerting them of an unconfirmed appt.
Waiver
Once an appointment is confirmed a waiver will be emailed out 3 days before their appointment.
If there are any issues with the waiver a text message will be sent to the Artist alerting them that there is a waiver that needs to be reviewed. The waiver is also visually flagged in the app.